There are multiple different ways to accomplish the same functionality in ServiceNow.
So our jobs as admins in the platform is to figure out what way is best, given a certain requirement from the business.
Regarding reading/writing/access to certain records in ServiceNow, it can get confusing when trying to decide how to make a field read only. When you look at the docs, and see that there are multiple ways, people just getting started in ServiceNow are left confused.
In this post, we’re going to review in detail, the different ways that you can make a field read only.
To my knowledge – there are 3 ways to make a field read only, in ServiceNow. These are certainly the most common and recommended ways. If there are other ways, we’d love for you to drop a recommendation for us in the comments, so we can keep this post updated.
A 4th option could be to make a field read only, at the Dictionary level. But this would apply globally and isn’t “dynamic” or changeable. So it’d always be readonly, which caters to much fewer people.
The below options are ways to make fields read only, sometimes.
Here are the 3 options:
You can write a client script, you can create an ACL, or you can use a UI Policy/Action.
NOTE: All of these options require the ‘admin’ role in ServiceNow. If you don’t have the admin role, then you simply won’t be able to implement any of the below configurations in your instance. And the ACL option of making a field read only, requires both ‘admin’ and ‘security_admin’, and you’ll need to elevate your privileges to activate the ‘security_admin’ role.
Let’s dive into each option below.
Make A Field Read Only With A Client Script
This is going to be the option for people who are comfortable writing code, or want to get more experience in that area.
With a few lines of code, you can easily set one or many fields read only. This can be based off of the values of other fields, who a user is, or any sort of conditional logic that you can script out.
Remember that this is a client script, so it can only be used client side. This will not work in a Business Rule or Script Include.
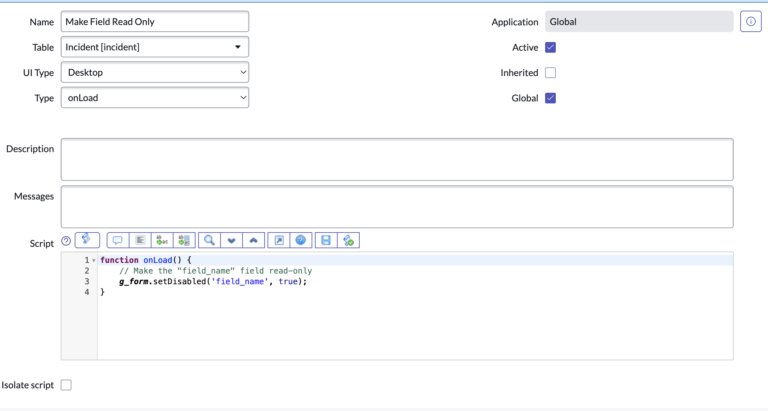
To make a field read-only using a client script in ServiceNow, you can use the setDisabled method of the g_form object. Here is an example of how you can use this method to make a field read-only:
- In the ServiceNow platform, navigate to the form that you want to modify.
- Click on the “Customize” button in the top right corner of the form.
- In the “Customize Form” window, click on the “Client Scripts” tab.
- Click the “New” button to create a new client script.
- In the “Script” field, enter the following code:
function onLoad() {
  // Make the "field_name" field read-only
  g_form.setDisabled('field_name', true);
}
Replace “field_name” with the actual name of the field that you want to make read-only.
- Click the “Save” button to save the client script.
This client script will run when the form is loaded, and it will use the setDisabled method of the g_form object to make the specified field read-only.
Alternatively, you can build some logic into this client script, to only make a field read only, under certain circumstances.
For example,
function onLoad() {

// Get the priority
var priority = g_form.getValue("priority").toString();

// Only execute the setDisabled() method, if it's a P1 incident
if (priority == "1") {

// Make the field_name field read-only, if it's a P1
g_form.setDisabled('field_name', true);

}
}
Note: You can also use the setReadOnly method of the g_form object to make a field read-only, but this method has been deprecated and is not recommended for use. The setDisabled method should be used instead.
When in doubt you should usually try to create a UI Policy/UI Policy Action, because it’s easier for people to go there than to look through code.
If you have ServiceNow admins that aren’t comfortable using code, then they won’t be able to go in and modify your scripts. But this all depends on your team and company.
Make A Field Read Only With An ACL
This is going to be the most secure way to make a field read only, by creating an ACL.
ACL’s can be created to allow/prohibit CRUD operations, based on a users role. These can apply to records, fields and tables.
Remember that you have to elevate your role to ‘security_admin’ to work with ACL’s.
So what is an ACL, in more detail?
An Access Control List (ACL) is a set of rules that determine whether a user or group has the ability to perform certain actions, such as reading, writing, or deleting records in a table. You can use an ACL to make a field read-only in ServiceNow by creating an ACL rule that denies write access to the field for the desired users or groups.
We can dive into the step by step process of how to create an ACL below.
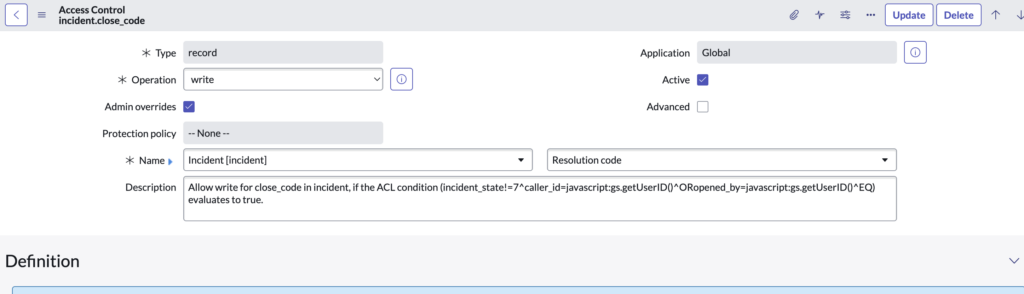
Here’s how you can create an ACL rule to make a field read-only in ServiceNow:
- In the ServiceNow platform, navigate to the “System Security > Access Control” menu.
- Click the “New” button to create a new ACL rule.
- In the “Name” field, enter a name for the ACL rule.
- In the “Table” field, select the table that contains the field that you want to make read-only.
- In the “Operation” field, select “Write”.
- In the “Condition” field, enter a condition that specifies the field that you want to make read-only. For example, if you want to make the “field_name” field read-only, you can enter “field_name != NULL” in the condition field.
- In the “Action” field, select “Deny”.
- In the “Roles” field, select the roles or groups that you want to deny write access to the field.
- Click the “Submit” button to save the ACL rule.
This ACL rule will deny write access to the specified field for the specified roles or groups, effectively making the field read-only for those users.
All access in ServiceNow is fundamentally controlled by ACL’s. By default ALL data in ServiceNow is locked down. You need to create ACL’s to open up and allow users to interact with this data.
There’s a really helpful ACL or Security Debugger tool in ServiceNow, that you can turn on to debug ACL’s.
Note: If you want to make a field read-only for all users, you can set the “Roles” field to “All” when creating the ACL rule. However, be aware that this will also make the field read-only for users with the “admin” role, so use caution when applying ACL rules to the “admin” role.
ACL’s can be difficult to manage and create, but there’s a lot of power in understanding how they work.
Let’s talk about UI Policies and how they can be configured to make fields read only in ServiceNow.
Make A Field Read Only With A UI Policy And UI Policy Action
These are the easiest and most straightforward to configure in ServiceNow.
Since they require no scripting and are super easy to build out – this should be your go-to when trying to figure out how to make a field readonly in a certain circumstance.
All you do is define the conditions, when a field should be read only, and then make a UI Policy Action, for each of the fields you’d like to make read only. All UI Policies are either true or false, and if it’s true – the related UI Policy Actions will be activated and kick in, doing whatever was set up.
You can make fields read only, visible and read only in a UI Policy Action.
Let’s talk about how you build them.
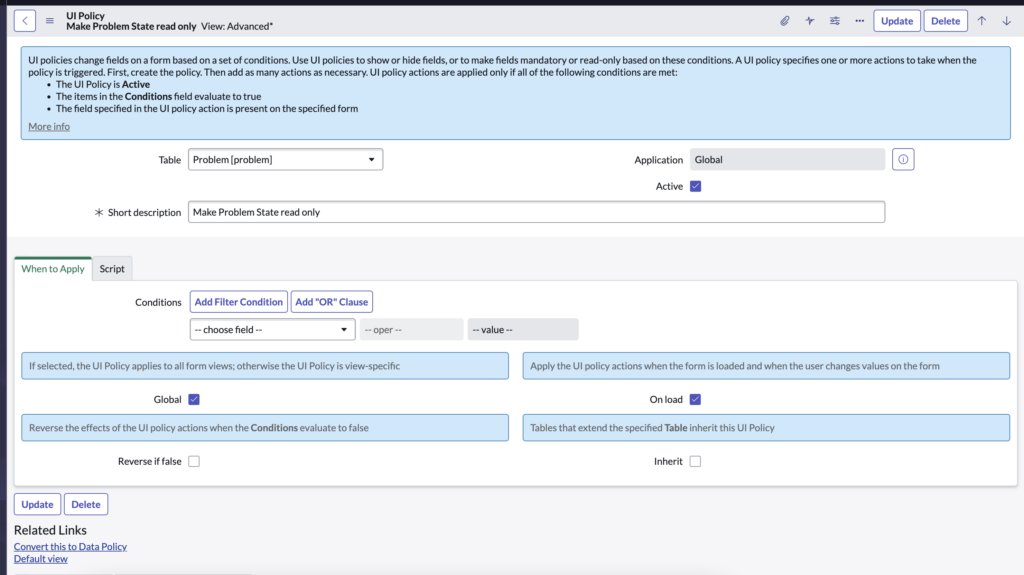
Here’s how you can create a UI Policy and UI Policy action to make a field read-only in ServiceNow:
- In the ServiceNow platform, navigate to the “System UI > UI Policies” menu.
- Click the “New” button to create a new UI Policy.
- In the “Name” field, enter a name for the UI Policy.
- In the “Table” field, select the table that contains the field that you want to make read-only.
- In the “Condition” field, enter a condition that specifies when the UI Policy should be triggered. For example, you can enter a condition that specifies a specific field value, such as “state=Closed”.
- In the “Actions” section, click the “New” button to create a new UI Policy action.
- In the “Type” field, select “Read Only”.
- In the “Fields” field, enter the name of the field that you want to make read-only.
- Click the “Submit” button to save the UI Policy action.
- Click the “Submit” button again to save the UI Policy.
This UI Policy will be triggered when the specified condition is met, and it will set the specified field to read-only using a UI Policy action.
It’s a simple as that.
It’s a great feature because it’s easy to setup and also to debug, if it ever comes to that.
Note: You can create multiple UI Policy actions for a single UI Policy, and you can specify multiple fields in the “Fields” field by separating the field names with a comma. For example, “field_name_1, field_name_2, field_name_3”.
If you have a solid grasp on all of the above options, and know when to utilize them – you’ll quickly escalate in your ServiceNow career.
Make sure to get comfortable using all 3 options.
That wraps up this article.
Are there other ways you have made fields read only in ServiceNow?
This one i.e., UI Policy would make it read for all the users. What if we want to have read only access on certain fields on certain conditions for a specific group.
This one i.e., UI Policy would make it read for all the users. What if we want to have read only access on certain fields on certain conditions for a specific group.
Excellent article for my ‘use case.’ Things like this do eliminate the need for code.
I can still see if one wants something ‘specific’ (code for conditions the filter could not use, then ‘code’ away. However, in most cases, no code should be needed